Joining Photography Talk

I am joining PhotographyTalk and you can view my n00b account here and observe as it gradually flourishes into something interesting!

As I explored the set-up of this website, I realized it seems a bit more easy for me to access forums that will get me tips, as well as showcase my photos in places that will get lots of views and welcome criticism, than Flickr. I still enjoy Flickr as a place to have my overall gallery because it is so easy to download and organize, but I am going to try to get into this site as well.

I found it very easy to sign up (I just needed to create an account with my Google account – so handy!) and then it asked me if I wanted to sign up for e-mail subscription to photography tips. Why not! That would be extremely helpful – as my schedule is getting more busy, it will be nice to have e-mails show up that can give me some routine guidance in where I should continue my photography skills.

phototalk

Here is a screenshot that shows a nice, organized list of things to do to get acquainted with and take the most out of the website. I especially like the Ask/Answer Forums! I have already created an account and profile. Further down the list it will show me a list of photographers I can follow, and will prompt me to upload a photo. I feel like there is a lot more direction here to learn and improve and TALK (hence the name).

Long Exposure Photos (The Tasteful Blur)

So from personal experience I learned that long exposure photography (capturing movement as a blur) needs to be done in low light… When I Youtubed long exposure photography, videos with “low light photography” also showed up – no surprise there. Also this video shows the LG G4 being tested in a special lowlight box – again, this now makes sense.

This video gave me the idea of using special filters to lower the lighting of the phone so I can take daytime photos, however, for now I will work around it. In the meantime I will try to find anything dark and translucent!

I quickly realized that this evening would be a good time to take traffic photos in different parts of town. I will try to keep other photography tips in mind, to get the “perfect” shot, but I realize this is my first time shooting long exposure photography and so everything may not come together all that great. Wish me luck!

After the shoot:

I realized two things after attempting to shoot a long exposure nightlife still…

First of all my hot glue gun failed me and I need to krazy glue my tripod back together because LE shots are super blurry without stabilization…

Secondly, this is the best photo I can get. Swift isn’t exactly a hopping place on Sunday night.

It looks cool but……… Random. It doesn’t tell much of a story, except maybe one of a lonely highway. Not what I want with LE.

I have decided I will map out the bigger city I will be visiting next weekend for good high traffic areas (like the video on this post suggested) and try it there – with a tripod.

The night wasn’t totally wasted. I got really excited over the dark orchid sky and snapped some spooky shots… Some even through my windshield. I experimented with a variety of filters. I love the last photo because to me it seems to tell a story of Town & Country… It looks split into country (trees) and city (street and building lights). I chose a better time of day woohoo!

Which version of the last photo do you like most? I am torn!

Landscape Shots on a Foggy Day


Today I focused on a few tips I learned – two I followed correctly and three could have been done better.

The three I neglected would be the long exposure preparation, shooting at the right time of day, and using RAW files for clearer editing. I was itching to go out and take photos so I went in the afternoon instead of the morning/evening. I don’t think it would have mattered much, however, because the weather was overcast and gross all day. I did manage to capture a bit of the immense fog that covered the city, fortunately.

As for the long exposure preparation, I set up my camera in front of a fast-moving stream and set the shutter speed to really slow. I forgot that, if the shutter speed is really slow, it is going to let a lot of light in. Because I was in the natural daylight, I was already at ISO 50 and could not go any lower. Therefore my photos turned out blinding white. I lowered the shutter speed to 1/60 (not long enough to get the wispy motion blur in the stream) and I am glad I experimented with it in Photoshop. I thought, maybe by sheer luck, it will turn out if I “Invert” the colors. I tried it, and – although it definitely did not work – I discovered how to make a fiery scene of lava and fire in Hell…

Landscape Photos March 5

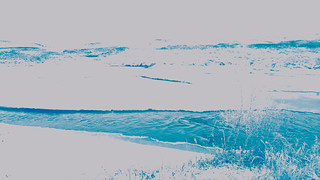
This is the original, except I edited it a bit so the water was easier to see…

Landscape Photos March 5

This is the Inversion… (SO COOL)

Also the majority of the photos I took I did in Auto, not in manual, and therefore were not done in RAW. I felt like the quality of the photos deteriorated while editing because of this. Oops.

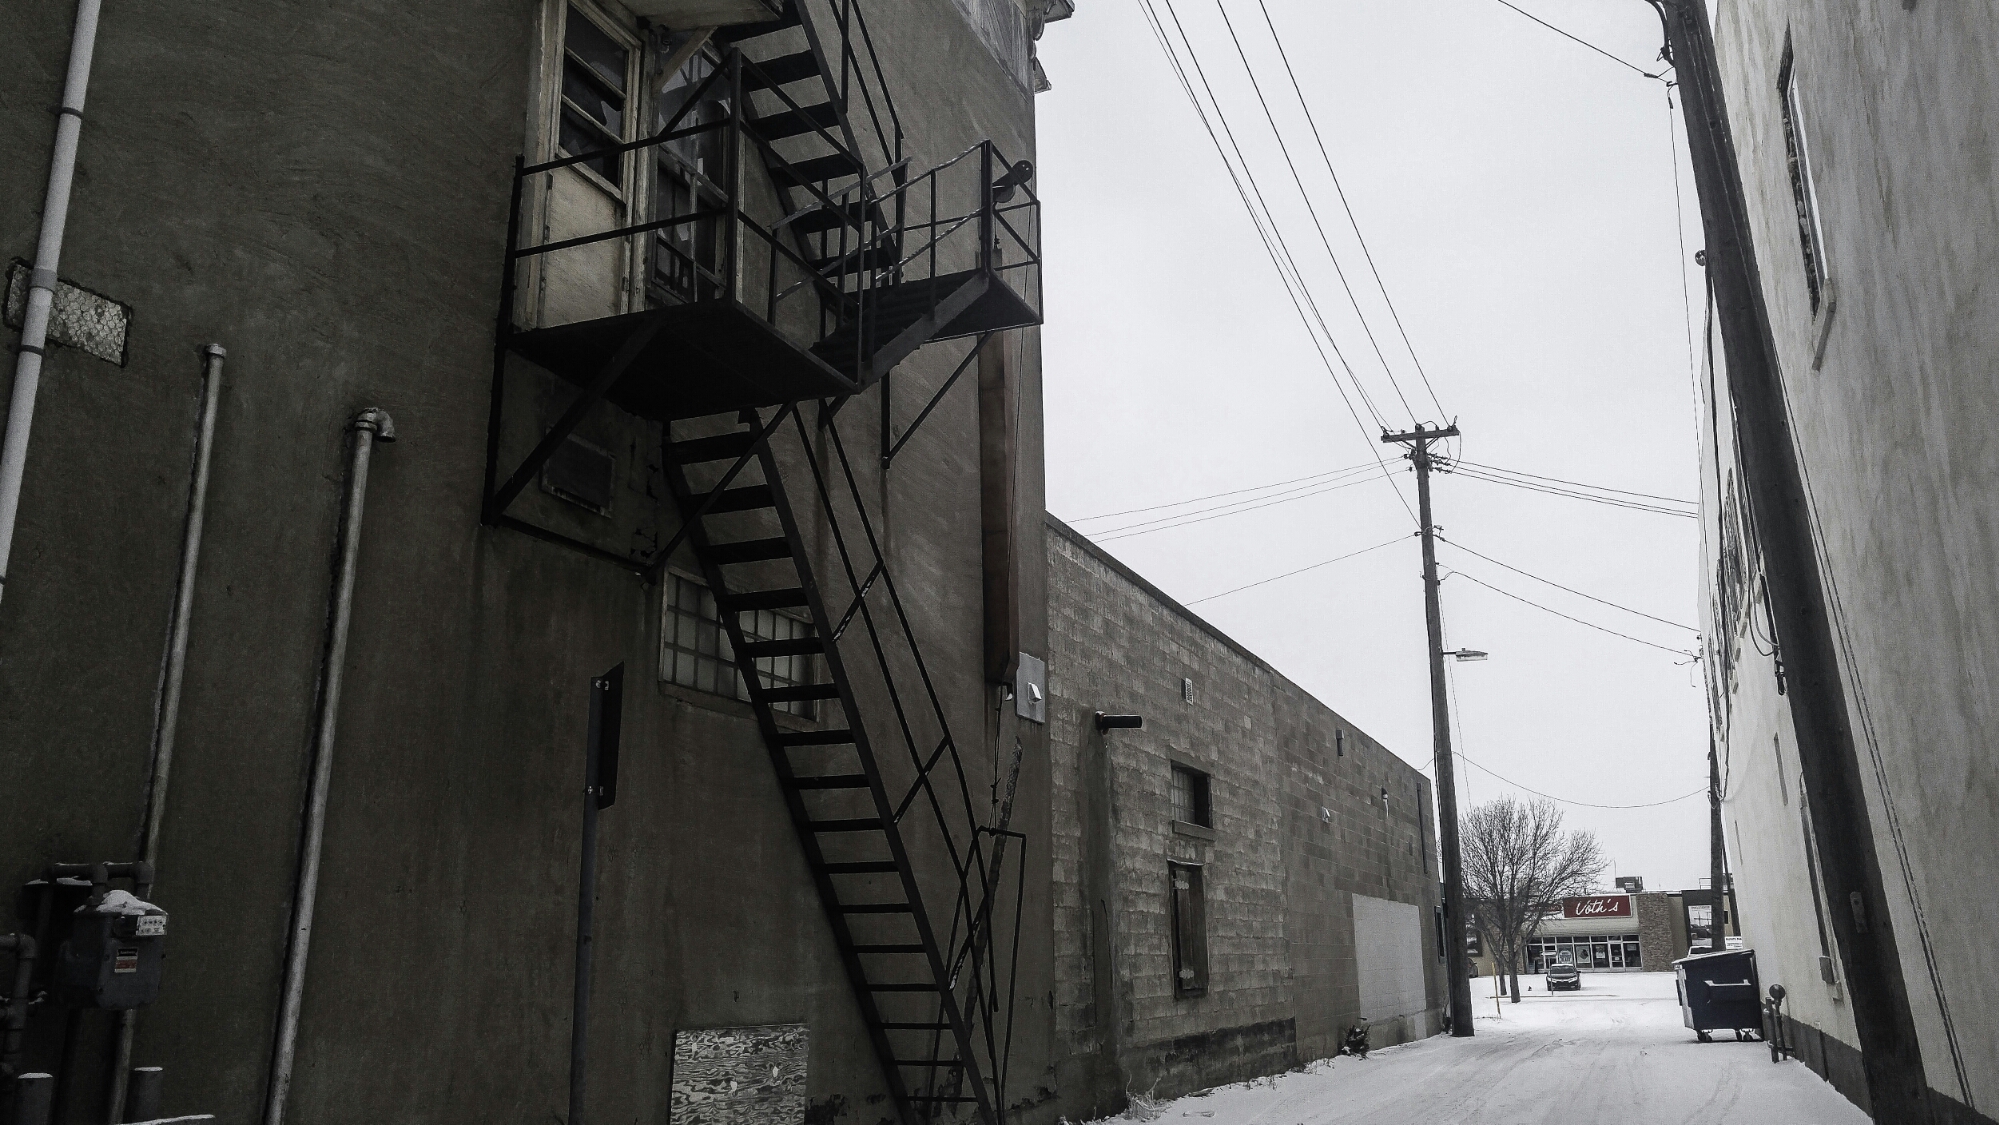
What did I do well? I believe I did well focusing on finding something of different contrast to the background to have as the subject of my photos (Corla’s initial tip) and I believe I did a good job of taking shots from different angles/heights until I found the shots I wanted.

Here are my main favorites from the day, and their originals alongside them:

Landscape Photos March 5

This panorama was shot with my tripod panning horizontally in Auto mode. I then used the Haze filter with Photoshop!

Landscape Photos March 5

I spooked some geese in a field. I used some filter in Photoshop but cannot remember which one. Also notice the cool fog hiding the city buildings in the background.

Landscape Photos March 5

Rotated Edit March 5

Railroad tracks make for nice “leading lines” I found. I also followed Corla’s idea of contrasting the subject (the white-and-black railroad) with the background (washed out winter grass and a grey sky).

Check out my edited landscape collection on Flickr (I am starting to learn to only put the good, final products into an album – less “junk” photos to sort through to get to the good ones).


Also, bad news – I snapped off the top part of my tripod as I was running back to the car. It was SO COLD. I have glue-gunned it back together and, fingers crossed, hopefully my phone-camera will still stay attached.

Happy snapping, fellow photographers! Feedback always welcome!

Learn How to Take Great Landscape Shots in 4 Minutes!

I found this awesome Youtube video that quickly gives 10 strong tips on landscape photos. I will keep them in mind as I shoot landscapes in various places the next few days.

If you are a reader like me, you will appreciate these tips written out, but the visuals help INCREDIBLY for actually visualizing how you will take the shots.

  1. Pick the right time of day (morning, golden hour, sunset, and nighttime are best)
  2. Long exposures (have shutter speed at a low fraction to allow motion to blur – blur sky, or water in creek, or headlights of cars) – I want to try this at our creek
  3. Consider the foreground, middle ground and background of each shot (HAVE LAYERS!)
  4. Take panoramas
  5. Find unique points of view to take photos from (roofs, balconies)
  6. Rule of thirds
  7. Leading lines (have lines that lead the viewer through the photo – like roads, sidewalks)
  8. Natural frames (use two buildings on either side of a street to frame a subject in the middle)
  9. If the colors look bad, go black and white (something I already naturally figured out)
  10. Have a message (same as Trish told me – tell a story or have a purpose and make sure the audience can draw a story from it as well)

Selfie vs Self Portrait (Bonus: Projects to Try Around the House)


I have gathered some Youtube videos and watched them to get an understanding of how I can take a good self portrait. I am interested in doing this because I have myself available to myself anytime (haha) and I am interested myself in learning how to be a model (being on the other side of the camera). I also think it is refreshing to try to do a self-portrait (where I am on a timer, it is formal and staged and looks like a professional picture) versus a casual profile-picture “selfie” where you hold the camera and look up and make a duckface! The girl in this Youtube video basically explains it the same way as I had assumed. I want to take some nice self-portraits because I still intend on completing a double-exposure (as a kind of final product – to show why we take photography, not just to have a photo but so we can mix it with other art forms – photoshop – and, hopefully, I will put it on a canvas to show how art can be made with digital tools and actualized in real life to become a part of my home atmosphere).

I used my learning from last blog post to choose videos that had the most views and likes and chose these videos to view and share:

In the comments of the above video, user jsm666 has the tip of setting up a repeated shutter so the model (you) doesn’t have to get up continually to set each shot up. With my LG G4 I know I can do slow-repeated clicks on the selfie-facing camera (which is not as good of quality) but I will have to use the remote shutter release to get multiple shots from the back-facing camera without getting up. If I can find a way to take full-body photos and artistically hide my clicking hand, I will let you guys know! (I will maybe try to do shoulder-up shots.)

To clarify I don’t plan on doing boudoir shots for this learning project!!! I just thought these were good tips to get those dramatic profile shots like the ones you see in True Detective (where I got my original idea to try double exposure photography).


To end, I wanted to share this as some fun little projects anyone can do – the long-shutter shot of an object looks really fun!

Photography and General Digital Literacy Tips!

I found this page on Photography Talk to be particularly useful, and not only for photography tips. It suggested a 5 dollar lighting app that will tell you where best lighting in an area is, and suggested sharing your photos online to get feedback (leading me to their own website where there is a forum for feedback which I plan to make use of) BUT…


The thing that really stood out to me, was how they approached talking about Youtube videos. They showed the stats of two videos in this image above, and asked which I should watch if I didn’t have time to scan all of them. I am not really Youtube literate so I figured either or would work since they were close in views. What I wasnt looking at, was the fact that one video had a higher ratio of likes to dislikes (and more likes overall) and the other had an even ratio of likes and dislikes. I know we are taught not to judge a book by its cover, but if I am wanting to look for quick handy tips I am probably best off going with what other people find handy too!

Lightbox Photoshoot!

I decided to spend one bleak winter evening inside, blinding myself while perfecting my lightbox photography skills. I have not read the “How to Use a Lightbox” article Trish recommended yet… Typical Taylor just went ahead and experimented.

When I looked at how small the box was it didn’t take me long to realize I need to be photographing small things. That is when it hit me… Why not turn it into a photoshoot that explains a bit about my diverse identity and interests?! There, I had a purpose. Then, to actually gather items and start shooting!

I set up my angles and arrangements with extreme care. I folded my rainbow headband and layered it with all of my Pride paraphernalia. I found every inch of tiger eye I own. I opened my book of poems and flipped to my favourite one.

I also read this handy website and mainly followed the feedback of looking at my subject and deciding what I wanted to draw attention to, of trying a subject from many angles, and of taking LOTS OF PICTURES! I only ended up doing a few true macros and only one stood out:

Originally I tried to get full bodied shots of Boris & Natasha (anyone remember Rocky & Bullwinkle?) but wasn’t liking how they turned out. My original purpose was focusing on the height difference but then I realized how stereotypical that is…. Everyone knows Natasha is twice his height. So I decided to pop my macro lens on (designed to clip over smartphones!) and focused on her vintage-drawn cartoon face that, to me, sums up 1960s ideals of beauty. I also used Dream filter from Adobe PS Express.

My portrait photos also turned out well following these three simple tips.

I followed Trish’s advice on assymetry in photos and dound that my photography looked professional when adding three different focal points. I also played with positioning so the light hit the brown stones just right.

Originally I kept trying to get all of Petrie’s body in the shot, but to me it then lacked personality. I needed to artistically crop it to draw focus to his gestures. I found that if I zoomed in on his eyes, beak and arms, his posture told unique stories from different angles. For example this is “Let me tell you a story about a BIIIIIG dinosaur”…

This is…. “Waaaaaait wait waitwaitwait… What?”

And my favourite: “But wait, there’s more!!”


Again with the odd number of objects and asymetry.

A poem I wrote with a surprise twist at the end. It won me first in 8 or 9 provinces of Canada for a Young Poets contest. Also my governor general award in the back. A photo that sums up my major achievements.

And a good motto to live by.

Lightbox Photoshoot!

I decided to spend one bleak winter evening inside, blinding myself while perfecting my lightbox photography skills. I have not read the “How to Use a Lightbox” article from Trish yet… Typical Taylor just went ahead and experimented. 

When I looked at how small the box was it didn’t take me long to realize I need to be photographing small things. That is when it hit me… Why not turn it into a photoshoot that explains a bit about my diverse identity and interests?! There, I had a purpose. Then, to actually gather items and start shooting!

I set up my angles and arrangements with extreme care. I folded my rainbow headband and layered it with all of my Pride paraphernalia. I found every inch of tiger eye I own. I opened my book of poems and flipped to my favourite one. 

I also read this handy website and mainly followed the feedback of looking at my subject and deciding what I wanted to draw attention to, of trying a subject from many angles, and of taking LOTS OF PICTURES! I only ended up doing a few true macros and only one stood out:

Originally I tried to get full bodied shots of Boris & Natasha (anyone remember Rocky & Bullwinkle?) but wasn’t liking how they turned out. My original purpose was focusing on the height difference but then I realized how stereotypical that is…. Everyone knows Natasha is twice his height. So I decided to pop my macro lens on (designed to clip over smartphones!) and focused on her vintage-drawn cartoon face that, to me, sums up 1960s ideals of beauty. I also used Dream filter from Adobe PS Express.

My portrait photos also turned out well following these three simple tips. 

I followed Trish’s advice on assymetry in photos and dound that my photography looked professional when adding three different focal points. I also played with positioning so the light hit the brown stones just right. 

Originally I kept trying to get all of Petrie’s body in the shot, but to me it then lacked personality. I found that if I zoomed in on his eyes.

Shooting (Photos) Downtown

I was originally going to do what Trish suggested and photograph something stationary at different times of the day, but today is a gross day for weather (wouldnt do a great job of showing shadows and sunsets etc) and so I decided to take Trish’s other advice – of getting out and taking as many shots as I can, all with purpose in mind.

I put out a question on Facebook asking where I can take good landscape photos (I chose a focus or purpose) and got an amazing amount of response… Both silly and serious. However I opted to go with cityscape photos of downtown instead. My purpose was to shoot buildings and places that are historical landmarks of Swift Current… Places that tell a history, maybe not always cheerful histories, and are instant reminders that this place is “home”. All of these photos are as familiar to me as the back of my hand. I decided I don’t always have to do hours of research before I go out so I read one web site and decided I would focus on different angles (look up, down, move camera tripod to different sides to take photo of object) and that I would try to include focal points. The first photo I took you can see below (it is of the downtown and outskirts of town… This is basically the view from my front window) has no focal point. The site says to have something the eye is initially drawn to on the photo. If you look at my Flickr album, I am curious… What are the focal points for you in some of the photos below? What stands out at you first? What stories or questions do you have after looking at these photos?

I will only talk in depth about my favourite photo… The blue truck at the Imperial Hotel. To me I love this photo so much because first if all – it looks like something off the movie/TV series Fargo – now do you get the Shooting pun in my blog title? –

and also, it invites so many questions and curiosity. There is no snow under the truck… How long has it been parked there to have no snow? Why? Why is it parked crooked? Why does the sign to the right have no board in it – what did it used to say?

Also it follows Corla’s advice of contrasting the main focal point (the truck) from the background. The landscape is bleak, bland, grey, while the old truck is a vibrant blue. Now I did “cheat” and I increased the vibrancy on the truck, but still, the final product is so cool!